If the pictures in the tutorial are too small you can click on them
to make them full size.
*DISCLAIMER* Before I go any further I need to say, that I cannot take full
credit for all of the information in this tutorial. Some of it comes from my own
experiences made up of trial and error and some of it I learned from other
tutorials down through the years.
Plugins are an amazing little tool that lets you take PSP to a new level and most
of us have our favorites, the "go-to" plugins that we use all the time.
For me, it's Super Blade Pro (SBP).
If you don't have Super Blade Pro you can find it HERE
Before you get started, I should tell you that it can be more than a little
confusing when you first try to use SBP and I have to admit that after
several years of playing with this plugin, I finally found an easier way
to use it.
For those of you who are unfamiliar with SBP there are two folders
to store your goodies.
You have "environments and textures" and "bladepro presets".
When you download new presets they come in folders complete with their
q5q and .bmp files
Put ALL of your preset folders in your "environments and textures" folder.
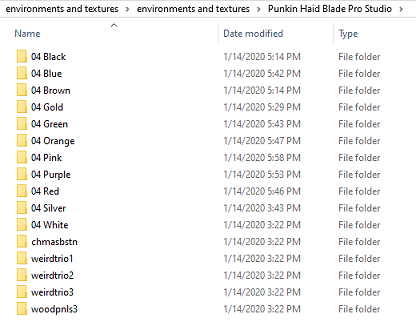
Since writing this tutorial I discovered that the way I organized my collection
of SBP Presets was wrong and about the only thing I had right was that the
folders were in my environments and textures folder.
I thought I had come up with a brilliant method of organizing when I decided to
separate my presets .q5q by color. Each color had it's own folder but all the
.bmp files were lumped together outside the folders.
I know. I can hear your gasps from here.
Here is a screenshot of my "brilliant" jumbled up mess.
To fix it I would have to start from scratch and download each preset over again
(IF I could even find them) and I just can't psyche myself up for the task.

I had the right idea but the way I did it was wrong, and I really didn't see the
error of my ways until (January 2020) when I downloaded some new presets and
decided to keep THOSE folders separate from the rest.
It was a life-changing event. :-)
When I did that I realized that I should have kept everything together from the
get-go, instead of separating the .bmp and .q5q files .
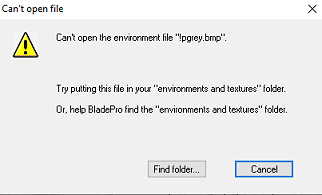
The whole process runs a lot smoother now, so when that little panel pops up and
asks me to find such and such .bmp file, the .bmp file is right there and if there IS a
problem with a missing .bmp file I don't have to go hunting for it.
I wish I had figured this out a long time ago.
So now, when I download a new collection of presets, I sort through them and
organize them by colors, but only for that collection.
Here is a screenshot of my Punkin Haid Blade Pro Studio Presets folder.
Here is a screenshot of the 04 Red Folder
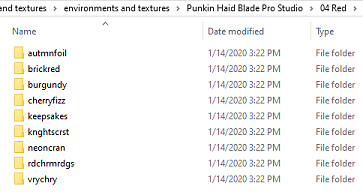
And this is what the Burgundy folder looks like.
The .bmp and .q9q files sitting together all nice and neat just like they
should. Well, it makes me feel all warm and fuzzy on the inside.

=================================================
Out of the goodness of their hearts, whenever you install PSP, Jasc (and now Corel)
creates a folder for all of your PSP Goodies, right in your Documents folder.
It's called My PSP Files and I put everything but the kitchen sink in that baby.
You will have to create a Plugins folder. For some reason it's not included.
Once in awhile you come across a persnickety plugin that refuses to work unless
you put it directly in the Jasc or COREL PSP Plugins folder, but this is rare.
Now that you have Super Blade Pro installed you will want to have some fun,
and you will definitely need some Presets.
Here are a few to get you started.
000 SBP PRESETS
I did NOT create these presets.
I tried to contact the creators but my emails bounced back to me
and Google searches didn't provide any more information.
All you have to do is unzip the folder and then Copy and Paste the folder into
your own Super Blade Pro "environments and textures" folder.
You might need to RESTART PSP for any Plugin changes to show up.
Are you ready to get started?
You can use SBP for anything from Picture Frames to Accents to Corners for
your Picture Frames but I decided to use Alpha Letters to show you what SBP can do.
For the Foreground and Background colors I chose White.
Regardless of what colors you start out with, most of the time, SBP will do its own thing.
Regardless of what colors you start out with, most of the time, SBP will do its own thing.
I am using A B C here for the example with these settings.

Go to Effects and Flaming Pear and then scroll down to SuperBladePro

This panel will pop up.
See the Red Arrow pointing to that middle area?
This is where you choose your Presets.

I want to use a Silver Preset so I am opening my SILVER folder.

I've been wanting to create an alpha with letters that look like
shiny metal so I'm going to try the POLISHED SILVER Preset
to see if it gives me that effect.

If you haven't used this preset before this panel will pop up
asking you to find it. This preset is from my days of separating
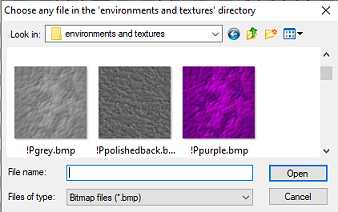
the files so I need to go back and find the .bmp file.
And here it is. !Pgrey.bmp file and
Don't panic or worry that you did something wrong if the
PREVIEW doesn't look right to you.
9 times out of 10 it will look nothing like the actual results.
Here is the Preview for my ABC letters with thePolished Silver Preset.

AND here is the actual result:

It still doesn't look shiny enough to me so I am going to use the
Inner Bevel Effect.
This is one of the settings that I use quite often for my Alphas.

Here is what my letters look like now, after using the Inner Bevel effect
and then Repeating it.

Maybe you're looking at those letters and thinking,
"Yeah that looks nice, but I want MY letters to shine, baby". LOL!!!
Well, then, let's try another Preset. This one is chrome.q9q

Yep! These letters are a lot shinier :-)

And now let's add some Inner Bevel and see what happens!

You can always change the Preset settings for different results.
Changing the Shape (upper left hand corner) or even the
Glare or Reflection will change the way your Preset behaves,
(or Mis-behaves) so don't be afraid to experiment and have fun.

Here are more examples:
15 PC POLISHED BLUE

12 MT ROYAL GREEN

PA OLD GOLD

BLACK GLASS

Here are a few websites to help you find more Presets.
http://www.omsds.com/bladepro/omssuper01.html
Meadows Studio
http://www.meadowsstudio.com/index.html
Cloudslight SBP Presets
http://www.cloudslight.com/set01.html
Dreamview SBP Presets
http://varian.net/dreamview/dreameffects/samples/vbp01/vbp01.html
Pixel Art by Joyce
http://www.pixelating.com/Treasury/Blade/bladeS.htm
Essex Girl
http://www.essexgirl.uk.com/sbp_presets-index.htm
Excellent tutorial...thx! ;)
ReplyDeleteHolly, thank you so much for the compliment, sweetie.
DeleteWhat a great tutorial! Thanks. I usually use what's in PSP but nice to add some creativity to things. Thanks a bunch for sharing your time and talent.
ReplyDeleteYou're very welcome.
DeleteI made a similar mistake by separating out the presets from the .bmp and what a mess! I couldn't figure out anything in SBP. Thanks to you Susan O my creative juices have been cranked again. Great tutorial, much appreciated.
ReplyDeleteI am so happy that my tutorial was helpful.
Delete