
The Cannibal Jack O' Lantern
I CAME BACK TO THIS TUTORIAL BECAUSE
I NEEDED TO USE IT FOR AN ALPHA I WAS
MAKING AND I DISCOVERED THAT I LEFT
OUT IMPORTANT INFORMATION.
I GAVE YOU THE SETTINGS FOR THE 2ND
TAB -BASIC- BUT DIDN'T TAKE A SCREEN
SHOT OF THE FIRST PART.
I APOLOGIZE FOR ANY PROBLEMS THIS
HAS CAUSED YOU.
You can find my Cannibal Jack O Lantern alpha HERE
This tutorial is for the glow effect (above) using the following plugin
Alienskin Eye Candy 5 Impact Gradient Glow.
Before I started, I zoomed my Jack O Lantern to 200% so my Selections
would be easier to make.
STEP 1
Take your Jack O Lantern and duplicate 3x so that you have 3 layers.
This creates 3 Frames of animation in AS. (animation shop)
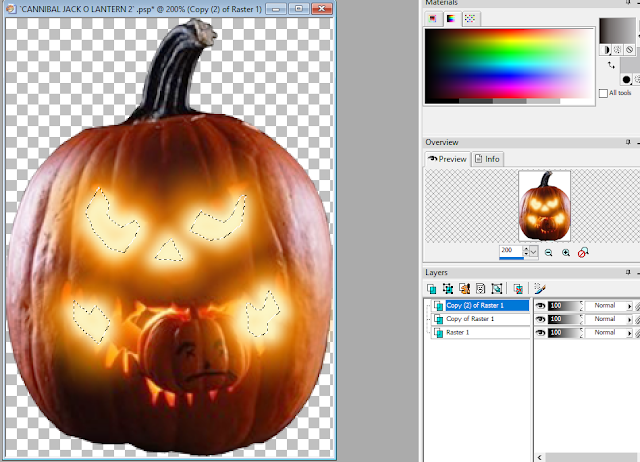
Now go to your Selection Tool
and choose the Lasso Rope for your FREEHAND SELECTION.
You only need to do this for the top layer.

STEP 2
When you are happy with the selections you have made, open your
Eye Candy 5 Impact and choose Gradient Glow.
Start with your Top Layer.
Here are the settings I used.

STEP 3
Now go to your 2nd layer (the middle layer) and use the same settings
but click on Random Seed at the bottom for a slight change.
Go to your last layer and click on Random Seed again.
STEP 4
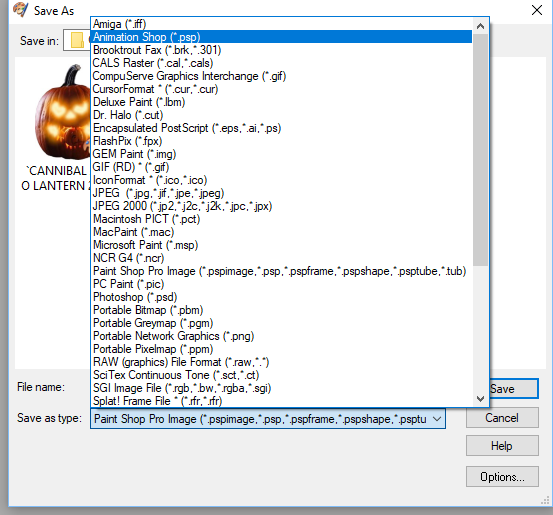
Save your animation as an Animation Shop file
STEP 5
Open your animation in AS and make sure that it is working properly.
You can change the speed here by clicking on Edit and Frame Properties.

Before saving your animation you might want to use the Optimization Wizard.
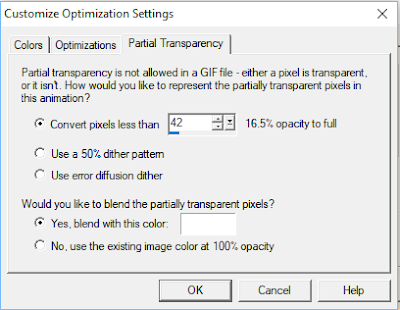
These are the settings I use (most of the time) for Partial Transparency:
I hope this tutorial helps you.
Hugz
Susan
Alienskin Eye Candy 5 Impact Gradient Glow.
Before I started, I zoomed my Jack O Lantern to 200% so my Selections
would be easier to make.
STEP 1
Take your Jack O Lantern and duplicate 3x so that you have 3 layers.
This creates 3 Frames of animation in AS. (animation shop)

Now go to your Selection Tool
and choose the Lasso Rope for your FREEHAND SELECTION.
You only need to do this for the top layer.

STEP 2
When you are happy with the selections you have made, open your
Eye Candy 5 Impact and choose Gradient Glow.
Start with your Top Layer.
Here are the settings I used.

STEP 3
Now go to your 2nd layer (the middle layer) and use the same settings
but click on Random Seed at the bottom for a slight change.
Go to your last layer and click on Random Seed again.
STEP 4
Save your animation as an Animation Shop file

STEP 5
Open your animation in AS and make sure that it is working properly.
You can change the speed here by clicking on Edit and Frame Properties.

Before saving your animation you might want to use the Optimization Wizard.
These are the settings I use (most of the time) for Partial Transparency:

I hope this tutorial helps you.
Hugz
Susan

No comments:
Post a Comment