Animated alphas are usually attached to a psp tube but this tutorial
is to show you a quick and easy way to make animated letters, so
I am keeping it simple.
So far, my tutorials for animated alphas have not included a basic tutorial
for letters with an animated fill.
My first tutorial for an animated alpha was a jack o' lantern with a flickering candle.
http://alphas-etc.blogspot.com/p/how-to-create-alpha.html
The animation part of these letters was for the outline (the foreground) and
it got a little complicated because I decided throw in a mini tut for the
flickering candle.
My 2nd tutorial showed you how use your to FILL change colors but that one
didn't include changing the FILL Angles to create the glitter or noise affect.
http://alphas-etc.blogspot.com/p/blog-page_21.html
This tutorial is for a simple alpha with an animated FILL.
We will make the animated fill by changing the Angles for your background.
STEP 1
Pick a FILL for your letters.
For this tutorial I am using -
glitter Blueberry33.gif
The font I am using is Young at heart.ttf
You will have three layers for three frames of animation.
This is what I use, but you can change the angles
1st layer FILL -- Angle 0
2nd layer FILL -- Angle 120
3rd layer FILL -- Angle 240
I start out by placing all of my uppercase letters on a New File 1000x900
because I want to make sure I have some "wiggle room" for my letters.
To make things easy for myself I keep an A-Z notepad file handy, so all I have to do
is Copy the letters, Activate your Text Tool and Paste.
Get the Font, Blueberry glitter and A-Z Notepad file here
Make sure that your Text Tool setting is Create As Floating
and NOT Vector or Selection.
![]()
This is what my 1st Step workspace looks like:
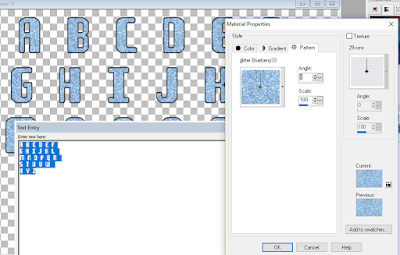
The ANGLE is set at 0
Click OK.
DO NOT DE-SELECT.
Click on Edit and choose Copy.
Click on your empty work space.
Right Click and Paste as New Image.
Now you have your 1st Layer and this will be the 1st Frame of your animation.
STEP 2
Make sure your Text Tool is active.
Go back to your original letters and go to Edit and Undo Text.
Place Text again.
Now change your Angle to 120
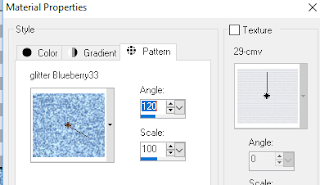
Click OK and Apply Text
Click on Edit and Choose Copy.

Go to your first layer of letters.
Right Click and Paste as New Layer.
This is your 2nd layer - the 2nd frame of your animation.
STEP 3
Go to Edit and Undo Text
Activate Text Tool and place your letters.
Change your Angle to 240

Click on Ok and then Apply Text
Click on Edit and Copy
Go to your 2nd Layer of Letters
and Paste as New Layer.
Now you have 3 Layers.
STEP 4
I usually add an Inner Bevel effect before I Copy and Paste
each new layer but I wanted to keep this tut easy to understand
so I am going to add instructions for adding an Inner Bevel here.
If you don't want to add an Inner Bevel you can skip to Step 5
Here are my settings for this alpha.
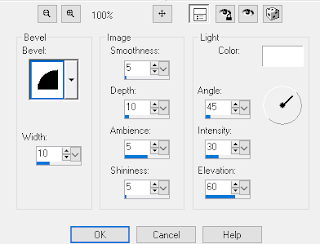
Width 10
Smoothness 5
Depth 10
Ambience 5
Shininess 5
Angle 45
Intensity 30
Elevation 60
Go to Raster 3.
Go to Effects -- 3D Effects -- Inner Bevel
Apply Inner Bevel
Go to Raster 2.
Apply Inner Bevel
Go to Raster 1
Apply Inner Bevel.
STEP 5
Open Animation Shop -AS
Activate your Propogate Paste

Go back to PSP.
Highlight Raster 1.
Right Click and Copy
Go to AS and Paste as New Animation.
STEP 6
Go back to PSP
Highlight Raster 2
Right Click and Copy
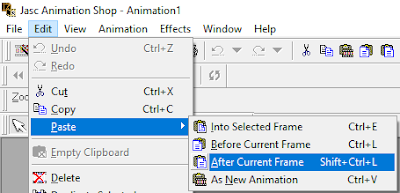
Go to AS and then Edit ->Paste After Current Frame
STEP 7
Go back to PSP
Highlight Raster 3
Right Click and Copy
Go to AS and then Edit ->Paste After Current Frame
Now you have all 3 frames of your alpha letters.
STEP 8
Go to Edit and Select All.
Go to View and View Animation to make sure your animation looks ok.
Now for the fun part :-)
STEP 9
Go to File and scroll down to Optimization Wizard.
This will pop up
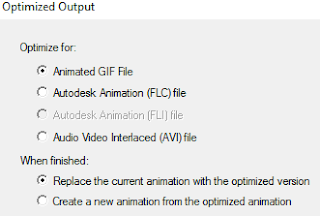
Click on Next
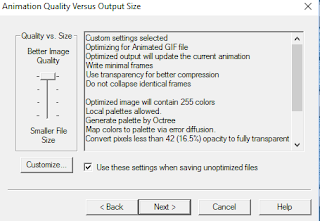
Click on Customize
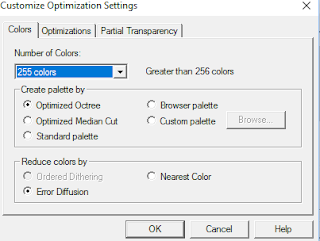
I have 255 Colors, Optimized Octree and Error Diffusion ticked.
Click on Optimizations
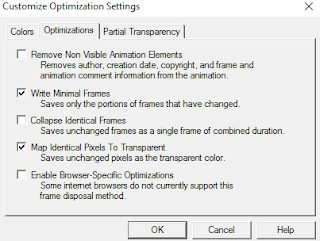
Click on Partial Transparency.
This is the most important setting.
It is also the most aggravating.
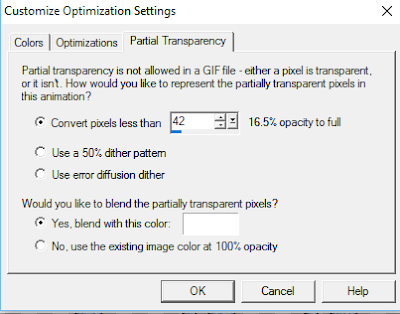
Click on Ok and then Next until you are finished.
Everyone has their go-to setting for this step.
This one is mine.
If I end up with jagged letters then I have to go in here
and fiddle around with the numbers.
I have had a few alphas where the 42 eventually became 125
just to get rid of the jaggies.
I have also had a few alphas where the 42 became a 5 or 10
to get a nice looking alpha.
STEP 10
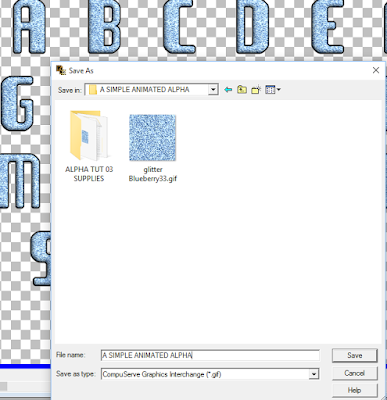
You are now ready to save your alpha and enjoy it.
Click on File and Save As.
STEP 11
Now you are ready to Cut out your letters.
Go to Edit and Select All.
Go to Edit and Copy.
Click inside your Work Space and Right Click
to Paste as New Animation.
Keep doing this until you have as many as you can deal with.
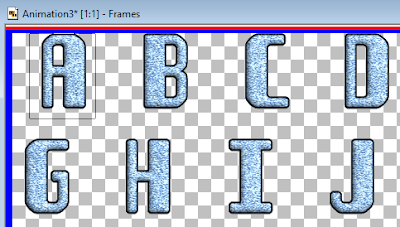
Go to your Crop Tool.
Outline a letter and Crop.
Click on File and Save As.
If you have any questions please feel free to ask for help.
Hugz,
Susan

Hi Susan,
ReplyDeleteDo you have a tutorial for adding a name to an alpha in PSP animation?
I like your website you have pretty alphas
Thank you for the compliment sweetie. Here is my tutorial for creating tags from animated alphas. I hope this helps.
DeleteHugz, Susan