To create a Floatie or Animated Fill for your alphas you should be familiar
with PSP and Animation Shop.
As always, my way is NOT the only way or the best way.
Before you begin make sure that you have a Preset Shape that you want
to use. You can use hearts or stars. Anything. The choice is yours.
(If you have tubes or png's of shapes you can use these too.)
If you don't have any hearts you can download these.
HEART PRESET SHAPES
I have a lot of Preset Shapes by SK and would like to give them credit
and obtain permission to use them but I can't find any information.
If anyone knows how to contact them please let me know.
Install the Preset shapes in your Preset Shapes folder.
You can find this in your Corel or Jasc folder or in your My PSP Files
located in your Documents folder.
STEP 1
Open AS (animation shop) and make sure that your Propogate Paste

is active.
Minimize AS.
Open PSP and create a new file 250 x 250 with a transparent background.
You can give the background a different color when you take it to AS.
STEP 2
Scroll down your list of Tools until you find your Preset Shapes Tab.

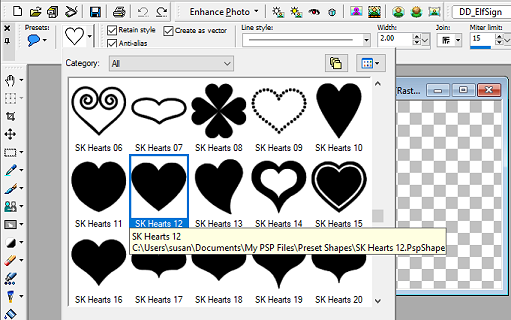
I picked SK Hearts 12.
STEP 3
The heart will show up as solid black regardless of what your
Foreground and Background colors are.

Click on your Move Tool
 to see your heart and then
click on your Crop Tool


STEP 4
To change the color of your heart go to Selections.
Select All.
Float.
Defloat.
To make sure that your color fills the entire heart
go back to Selections.
Modify.
Expand. and choose 1.
If you go higher than 1 your heart will lose some of its shape.
This is what it will look like.

Go down to your Paint tool and Choose your color.
I picked a deep dark red.
Fill your heart and save it as a .png file.

Make sure that your File name and
Save as type are both png or you won't be able to open it again.

Now you are ready to create a floatie.
STEP 5
Create a new file 250 x 250.
Copy your heart and paste it to the far left.
I placed 3 of them like this.

There was a lot of empty space left over so I cropped it.

You will have 4 Layers. The blank layer and the 3 hearts.
Go to Layers and Merge Visible to make one layer.
Duplicate this layer 6 times to make 7 Layers.
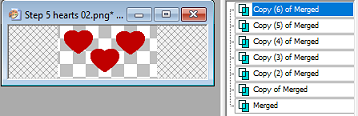
I've tried using only 3 or 4 Layers but the end result was choppy
instead of smooth, so I stick with 6 or 7 Layers.
These will become Frames when you take them to AS.
Now for the fun part.
STEP 6
*It is very easy to get distracted during this step.
I've done it plenty of times, where I lose track
of where I am and think that I've already changed
the Offset or I end up changing it twice.
So, take your time and try to stay focused.
Highlight the Top Layer and X -Close all other Layers.

Go to Effects and Image Offset.

The only thing we will change for each layer is the Vertical.
Horizontal: 0
Vertical: 10
Edge mode: Wrap
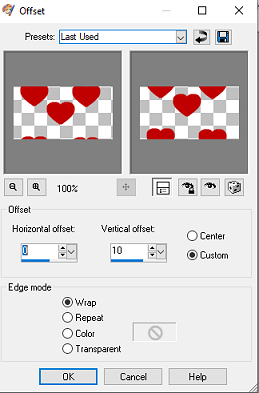
Now go back to your Layers and X out the Top Layer.
Open the next layer.

Go to your Image Offset and change the Vertical
from 10 to 20

Now X out this Layer and go to the Next Layer.

Change the Vertical to 30

Keep doing this for each layer adding 10 to your Vertical
but do not change the original Merged Layer.
Leave that one alone.

Now you will want to Save it as an Animation Shop File.
OPEN ALL THE LAYERS
and Highlight the Merged Layer.

I am using PSP 9 to create this tutorial but I also have PSP X6
and for some reason they haven't included this option.
If you are using a later version of PSP then you will have to
use the Copy and Paste method to take your Layers to AS.
STEP 7
*For Newer Versions of PSP
Highlight the bottom layer, it should say Merged.
Copy and Paste as New Animation in AS.
Go back to PSP and highlight the next layer.
Copy and then Edit and Paste After Current Frame in AS.
Do this until you have Copied and Pasted all of your Layers.
---------------------------------------------------------------------
Open the folder with your saved Animation Shop file
and Drag it into AS
OR
You can choose File and Open.
Edit and Select All.
It should look like this with 7 Frames.

Click on the Filmstrip to View Animation.

This is where you will discover any mistakes you made in PSP.
If you have to go back to PSP and start over just Copy your bottom Merged layer
and go from there. You don't need to throw the baby out with the bathwater,
So this is what you will have.

If you would rather have the hearts going up instead of down you can go to
Animation and Reverse Frames


If you are going to use your new animation as a fill for your alpha letters
then you will probably need to resize it.
Go to Animation and Resize Animation.
I picked 50% because I want most of the hearts to fill the letters.

*To change the speed click on Frame Properties
You can also change the color of your background.
Go to Animation and choose Animation Properties.

This panel will pop up.
Choose Opaque and the color you want to use.
I am going to choose Black.


*On a side note. It's a good idea to change the color of your
background before you save the file and remove it from AS
because saving the file might give your hearts little white edges
and it will show up on your background.
Like this:

Now you are ready to make an alpha with your new floatie or animated bg.
This is from my Valentine Gnome alpha
https://alphas-etc.blogspot.com/p/valentine-alphas-p4.html

No comments:
Post a Comment