Rest in Peace, Susan B.
She inspired me to write this tut many many moons ago,
for my Grim Reaper Alpha.
Many people have asked me,
"How do you take an alpha and turn them into tags"?
I hope this tutorial will help answer that question.
Whenever I create a tutorial I always worry that I will leave something
out, or that my tuts will be difficult to understand.
I believe that playing with PSP should be fun and not stressful, so I try
to have plenty of screenshots for each step. Have you ever started a tut
and you're going along fine, when all of a sudden they tell you to do
something, but you have no idea how to do it?
Yep! Me too! LOL!
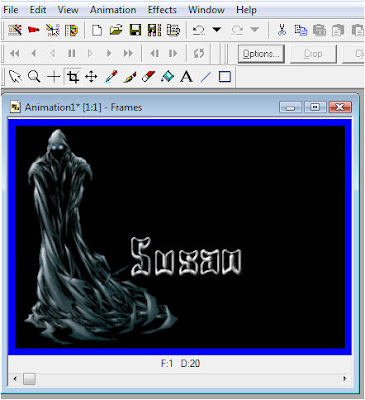
My Grim Reaper Alpha can be found here:
Grim-Reaper02-10-21-08-SMO
Let's open our PSP and
Animation Shop
and get ready to create your first animated tag.
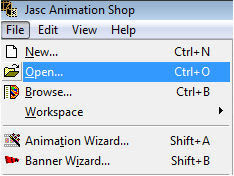
Step 1
Open Animation Shop and turn on your Propagate Paste button.
The Propagate Paste button is at the top, between the Clipboard
and the Red X icons. It looks like 3 pieces of paper.

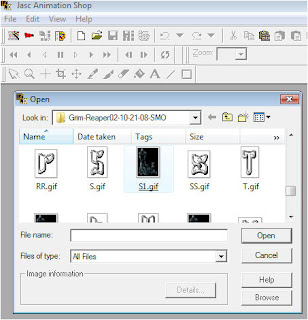
Click on File and OPEN
You don't have to use my Grim Reaper alpha. Any alpha will do.
You can also use the Drag and Drop method.
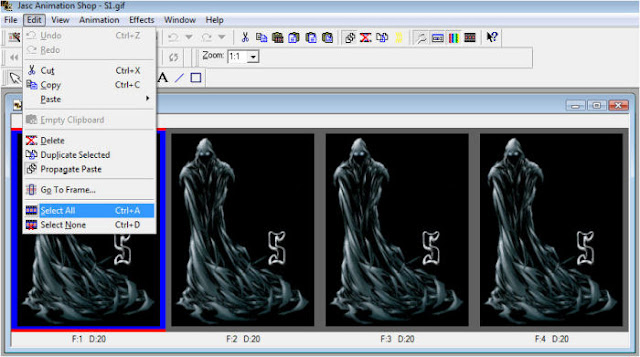
Step 3
Click on Edit and Select All or Ctrl+A to highlight all the frames.
Do this for all of the letters in your tag or the animation won't work right.
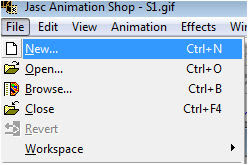
Step 4
Click on File and then NEW. This will be the new home for your letters.
This is also where you count the number of frames and pay attention to
the speed, or what is known as Frame Properties.
This measurement 400 x 270 was for a tag made from The Reaper Alpha.
Keep in mind that your New File size will change for each new alpha and
it will have to be large enough for all of your letters to fit.

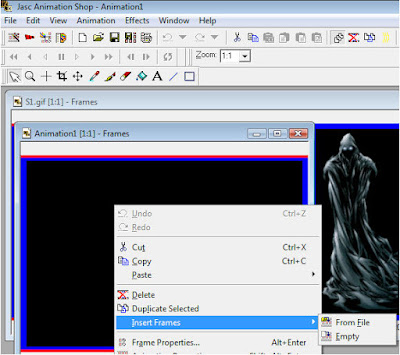
Step 6
This is where you will Insert Frames for your tag.
Choose FROM EMPTY.
There are 4 frames for the S1 letter.
(The other letters only have 3 frames but we need to go with the highest number.)
The new graphic where you will put the letters already counts as 1 frame
so you will only need to add 3 extra frames.
Step 7
Now we are going to add the frames.
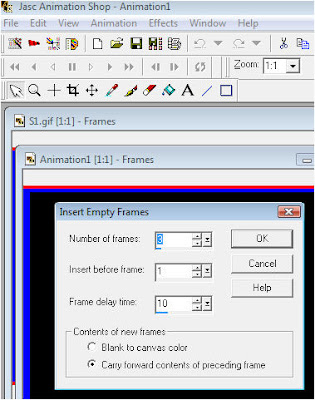
Step 8
Right Click Inside the new graphic and choose Frame Properties.
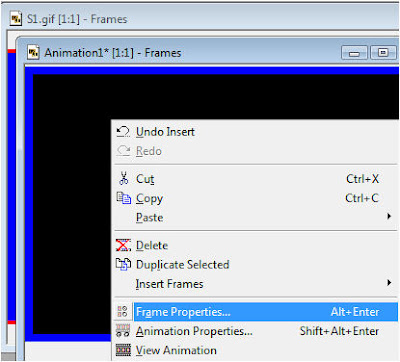
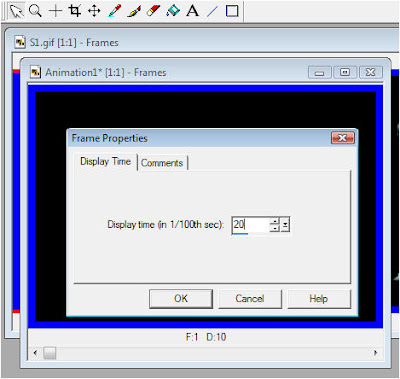
Step 9
At the bottom of S1 you see D:20-- that is the speed or Display Time.
Put the speed here. The default is always 10.
Step 10
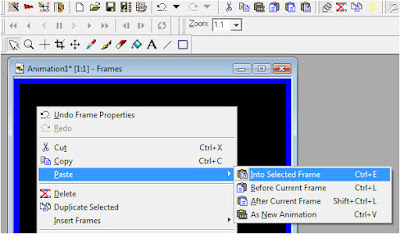
RIGHT CLICK inside the first letter of your tag, and choose COPY.
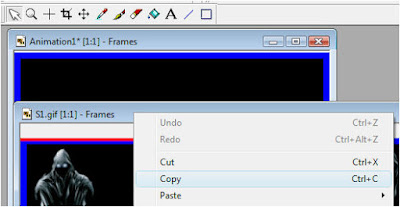
Step 11
Now RIGHT CLICK INSIDE the new home for your letters
and choose PASTE--> Into Selected Frame
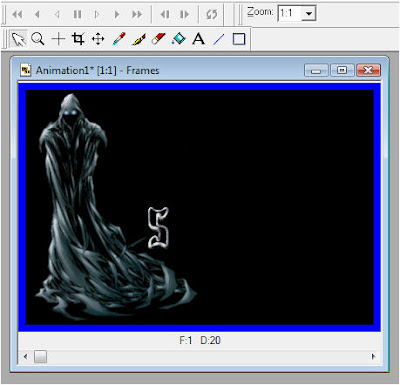
Step 12
Position your letter in the first frame, and when you are happy with where it is,
then click. Now you have the first letter of your tag in place.
Step 13
Repeat this step for all of your letters.
Make sure that each letter has all of their frames highlighted
before copying and pasting into their new home.
A wrong click here or there can undo the highlight.
I know.. this has happened to me LOL!!
Step 14
Well, now you have all the letters in place, but what if there is
too much room left over?
How do we fix that? Well, we crop it LOL!!
The Crop icon is right next to the Plus Sign.
You can see that I have it indented here.
Step 15
Move your cursor to the bottom and then go up until you have
the area outlined.
If it looks the way you want then you are ready to Crop it.
Step 16
Click on the CROP button sitting between Options and Clear.
The Clear button comes in real handy.
When you're measuring an area to be cropped sometimes
we make mistakes and we go either go too far or not far enough.
Just click on the Clear icon and you're safe.
I use this A LOT when cropping my letters for alphas. LOL!!
Step 17
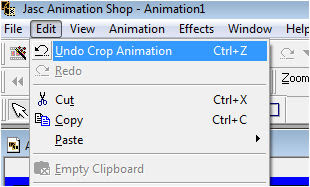
But what happens if you made a mistake and cropped it?
No Biggy. Just click on Edit and then Undo Crop Animation.
Step 18
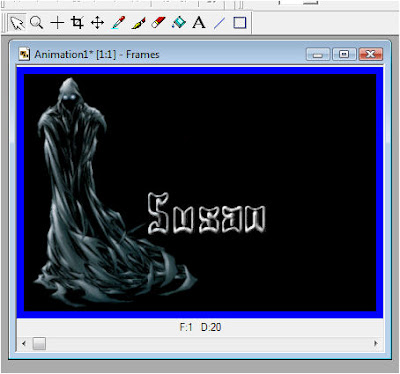
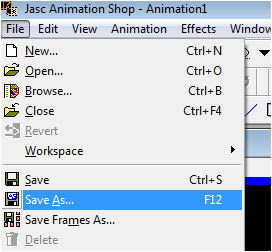
Now that you have your new tag you will want to save it.
Click on File and then Save As... and you're done!
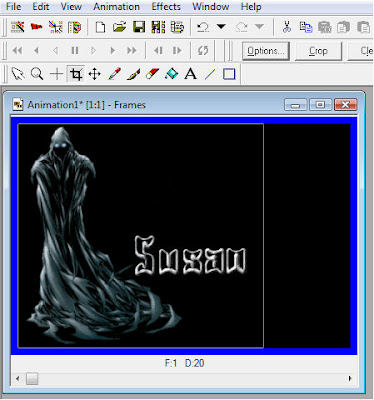
And your tag should look something like this

I hope this tutorial has helped you.
Big Hugz, Susan
and get ready to create your first animated tag.
Step 1
Open Animation Shop and turn on your Propagate Paste button.
The Propagate Paste button is at the top, between the Clipboard
and the Red X icons. It looks like 3 pieces of paper.

Click on File and OPEN

Step 2
Go to the location of your alpha and click on the first letter.You don't have to use my Grim Reaper alpha. Any alpha will do.
You can also use the Drag and Drop method.

Step 3
Click on Edit and Select All or Ctrl+A to highlight all the frames.
Do this for all of the letters in your tag or the animation won't work right.

Step 4
Click on File and then NEW. This will be the new home for your letters.
This is also where you count the number of frames and pay attention to
the speed, or what is known as Frame Properties.

This measurement 400 x 270 was for a tag made from The Reaper Alpha.
Keep in mind that your New File size will change for each new alpha and
it will have to be large enough for all of your letters to fit.

Step 6
This is where you will Insert Frames for your tag.
Choose FROM EMPTY.
There are 4 frames for the S1 letter.
(The other letters only have 3 frames but we need to go with the highest number.)
The new graphic where you will put the letters already counts as 1 frame
so you will only need to add 3 extra frames.

Step 7
Now we are going to add the frames.

Step 8
Right Click Inside the new graphic and choose Frame Properties.

Step 9
At the bottom of S1 you see D:20-- that is the speed or Display Time.
Put the speed here. The default is always 10.

Step 10
RIGHT CLICK inside the first letter of your tag, and choose COPY.

Step 11
Now RIGHT CLICK INSIDE the new home for your letters
and choose PASTE--> Into Selected Frame

Step 12
Position your letter in the first frame, and when you are happy with where it is,
then click. Now you have the first letter of your tag in place.

Step 13
Repeat this step for all of your letters.
Make sure that each letter has all of their frames highlighted
before copying and pasting into their new home.
A wrong click here or there can undo the highlight.
I know.. this has happened to me LOL!!

Step 14
Well, now you have all the letters in place, but what if there is
too much room left over?
How do we fix that? Well, we crop it LOL!!
The Crop icon is right next to the Plus Sign.
You can see that I have it indented here.

Step 15
Move your cursor to the bottom and then go up until you have
the area outlined.
If it looks the way you want then you are ready to Crop it.

Step 16
Click on the CROP button sitting between Options and Clear.
The Clear button comes in real handy.
When you're measuring an area to be cropped sometimes
we make mistakes and we go either go too far or not far enough.
Just click on the Clear icon and you're safe.
I use this A LOT when cropping my letters for alphas. LOL!!

Step 17
But what happens if you made a mistake and cropped it?
No Biggy. Just click on Edit and then Undo Crop Animation.

Step 18
Now that you have your new tag you will want to save it.
Click on File and then Save As... and you're done!

And your tag should look something like this

I hope this tutorial has helped you.
Big Hugz, Susan
I am so looking forward to playing an learning to make tags with alphas thanks for writing this tut
ReplyDeleteYou are very welcome sweetie :-)
ReplyDelete