
Many people have asked me down through the years if I was going to make a tutorial for an animated alpha
but I've always put it off, because there is so much more work involved in creating animated alphas,
(and many many more screenshots for a tutorial) than for your standard png alpha.
If you have never created an alpha, please read my tutorial on how to create a non-animated alpha
so you will be familiar with the process. Click on the link below to find the tutorial.
How To Create An Alpha
When you create an animated alpha, you will have to save your alphas in Animation Shop better known as AS.
One thing you need to know about creating your first animated alpha
is that you will meet up with the dreaded Optimization Wizard in Animation Shop.
Alpha Creators for over a decade now, have had a love-hate relationship with the Optimization Wizard.
For the lack of better words all I can tell you is that it's MOODY.
Well, that might be an understatement :-)
A lot of your success will depend on the font you choose. Some fonts work well with the Optimization Wizard,
while others tend to get jagged edges, and no amount of fiddling with the settings, mumbling under your breath,
or yelling at your computer will keep your letters looking like you originally made them.
There will be some alphas that require do-overs. A lot of do-overs. With a different font or color or both.
And then there are alphas that are a piece of cake. You will have quite a few of those.
A perfect blend of the right font and the right settings and you'll almost forget the trouble it gave you last week.
IT being the Optimization Wizard.
Choose the graphic or tube you would like to use for your alpha.
Keep in mind, that people use alphas to make name tags or extras, so if the tube and/or the font is too large,
and there are a lot of letters in the person's name, the finished tag will be enormous.
Before we go any further let's grab the supplies you are going to need for this tutorial.
Orange Glitter-- Place in your Patterns folder
Fire-- You will need to open this in AS
Spirits Font-- You can place this in your Fonts folder or open it with your Font program.
GET YOUR SUPPLIES HERE:
Supplies for Animated Alpha
The tube I am using by Anita Lee is not included with your supplies.
The name of the tube is AL2005~halloween02
and you can find it by visiting the Halloween section of her awesome website here:
Anita's Creations.
You don't have to use the jack o'lantern since the process is the same with any tube.
Since this is going to be an animated alpha, I decided to add a little flame for the inside of the
jack o' lantern but more on that later :-)
Before you get started it's a good idea to create a folder for your alpha, open it and keep it minimized
so you can keep track of the letters you've made if you get interrupted.
When you have your tube opened up in PSP choose the colors that you want to use.
I am using orange glitter for the foreground (the outline color) and black for the background (the fill color).
I originally wanted to use a black outline filled with orange glitter, but the Optimization Wizard,
despite much sweet talk and wooing, refused to cooperate with me. So I went back and re-made the letters.
Deciding which font to use can be tricky. You'll want to use a font that compliments your tube or graphic
and if possible, one that has both upper and lowercase. Some fonts don't have the lowercase.
I am using the SPIRITS font included in your supplies.
The first half of your work will be done in PSP.
This is where you create your letters and your layers for the animation.
~STEP 1~
Open your tube in PSP.
If you are using the jack o'lantern by Anita Lee, Resize it 40% using Smart Size.
Since there is not much you can do with it now, copy it and open it in AS as a new animation.
~STEP 2~
Click on File and then New.
I always use a workspace of 800x800. This way I can fit the lowercase letters if I have them.
The Materials Palette is where your animation magic begins.
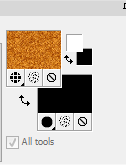
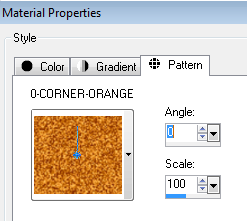
The foreground is set at Pattern -orange glitter - and black is for the background.
For the first layer of your letters you will want the Angle to be set at 0.
~STEP 3~
Now you are ready to start making your letters.
The Text Tool is on your side tool bar and looks like the Capital A.
The font size is important. You don't want your letters to be too large or too small.
IMPORTANT FOR WINDOWS 7 USERS
Minimizing the font will usually not work. You will need to download a FREE font program like
AMP Font Viewer
Open the font of your choice in the Font Viewer and then it will become available in the Drop Down Font Menu in PSP.
For this font I chose size 60. With some fonts, size 60 would just be too large.
Your Text Tool settings should look like this. Make sure the middle alignment is checked
and that Create as Floating is selected. The Stroke Width is set at 2.

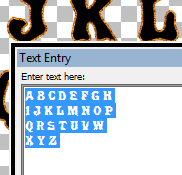
For this alpha I only used Uppercase letters. Set your Caps Lock button and type in each letter of the alphabet.
A quick note here:
You can make your lowercase letters right after your Uppercase and take them both to AS at the same time.
Make sure that you leave enough room in between each letter so that you will not have to use the Eraser Tool.
Once you are finished typing in your letters click OK.
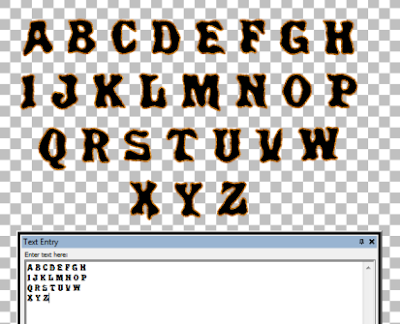
It should look like this with dancing ants around the letters:
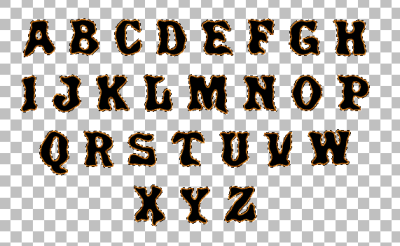
~STEP 4~
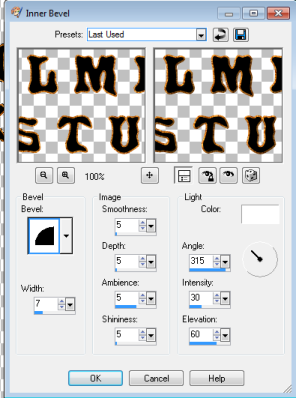
Now you will need to add the Inner Bevel effect.
You can use these settings or ones of your own choosing.
Click on Effects-->3D Effects and Inner Bevel
Select None.
Click on Edit and then Copy.
Paste as New Image.
You will see in your Layer Palette that this layer is called Raster 1.
You will also notice that the new image is quite small compared to the original.
Don't freak out, that is the way it is supposed to be.
~Step 5~
Now it is time to make the second layer of your letters.
Go back to your original workspace with your letters.
Click on Edit-->Undo Select None-->Undo Inner Bevel-->Undo Text
Now you will have a blank workspace to add your second layer of letters.
Click on your Text Tool and place your letters.
Make sure that your letters are highlighted so your changes will take affect.

Go to your Materials Palette and change the Angle to 120
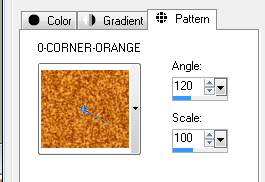
Click OK for your letters. You will see the same dancing ants around your letters.
Click on Effects-->3D Effects and Inner Bevel using the same settings.
Select None.
Click on Edit and then Copy.
Go to your first layer of letters, Right Click on the Blue Bar and Paste as New Layer
(I always right-click on the Blue Bar when I need to Copy something, instead of Edit--Copy)

You will see in your Layer Palette that this layer is called Raster 2.
Now your second layer is finished. You're moving right along.
~STEP 6~
Now it is time to make your third and last layer of letters.
Go back to your original workspace with your letters.
Click on Edit-->Undo Select None-->Undo Inner Bevel-->Undo Text
Now you will have a blank workspace to add your third layer of letters.
Click on your Text Tool and place your letters.
Make sure that your letters are highlighted so your changes will take affect.
Go to your Materials Palette and change the Angle to 240
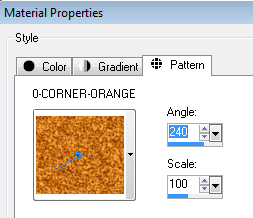
Click OK for your letters.
Click on Effects-->3D Effects and Inner Bevel using the same settings.
Select None.
Click on Edit and then Copy.
Go to your second layer of letters, Right Click on the Blue Bar and Paste as New Layer
This layer will be called Raster 3. These three layers will be your three frames of animation.
Open Animation Shop open and make sure that your Propogate Paste
 button is active.
Now you are ready to take your letters to Animation Shop or AS.
~STEP 7~
Make sure that Raster 1 of your letters is active (highlighted)
Right Click on the blue bar at the top and choose Copy
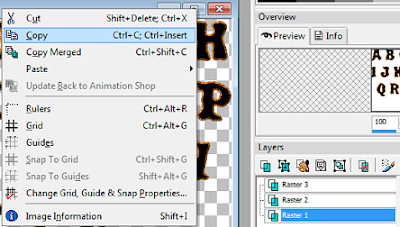
Go to AS and Right Click and then Paste as New Animation
Go back to PSP and make sure that Raster 2 is active.
Right Click on the blue bar and choose Copy.
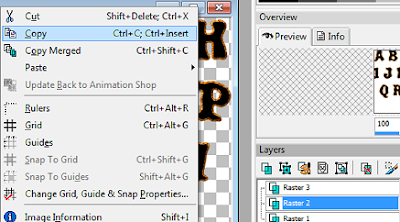
Go to AS and Right Click inside your letters and then Paste After Current Frame

Go back to PSP and make sure that Raster 3 is active.
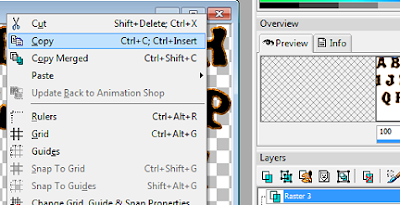
Right Click on the blue bar and choose Copy.
Go to AS and Right Click inside your letters then Paste After Current Frame

~STEP 8~
Now you are ready to check your animated letters.
Click on Edit and Select All. Click on the Icon that looks like a filmstrip.

If everything looks good and there is nothing wrong with your animation
you are ready to meet the Optimization Wizard :-)
~Step 9~
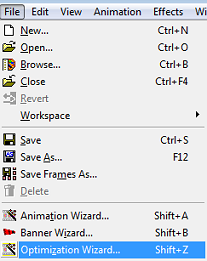
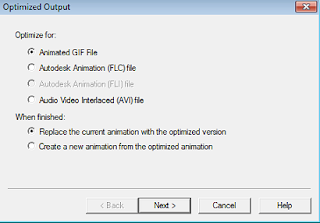
When this panel comes up choose Animated Gif File and then Choose Next
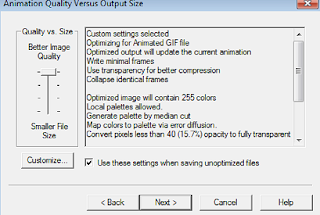
When this panel comes up click the Customize button
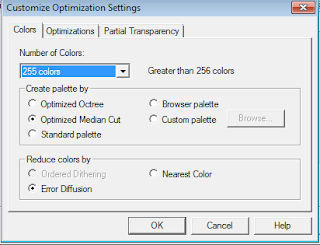
This panel is the Color Tab. Use the settings below:
Optimized Median Cut
Error Diffusion
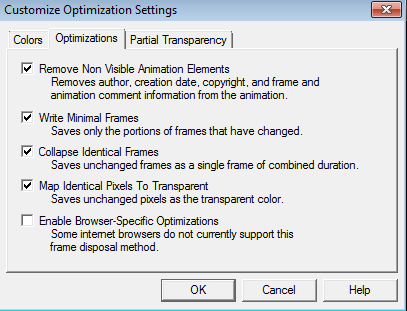
Click on the Optimizations Tab
This panel is up to your own choosing. Sometimes, if your animation isn't working right
you can fiddle around with this panel and try to fix it.
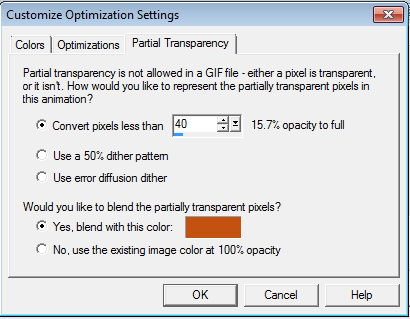
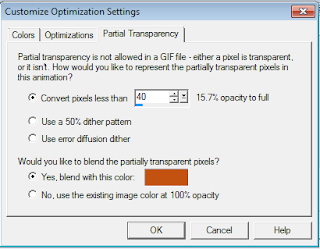
Click on the Partial Transparency Tab
This is the most important part of the Optimization Wizard.
For this alpha I used orange for the color because of the orange glitter and the orange in the pumpkin.
I usually pick white for the color so that it won't show up as much on a transparent background.
Convert pixels less than 40
This number can be changed from alpha to alpha.
Click OK and then Next until you are finished
Click on File and Save As.
When I save the letters I put the name of the alpha and the font and font size in its name.
For future reference.
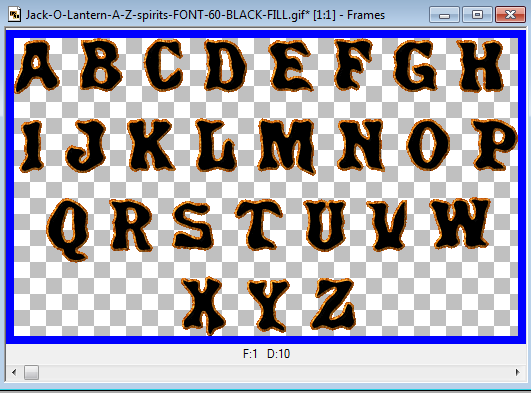
Well, now it's time to make your alpha. Are you ready? :-)
~STEP 10~
You will spend the rest of your time now in AS.
Your pumpkin "blank" should be sitting patiently in AS waiting to get animated.
Now we are going to focus on getting your pumpkin ready.
But, wait, your pumpkin needs a little more room for its letters.
Click on File and then New. I am using 270x190.
Make sure that Transparent is checked.
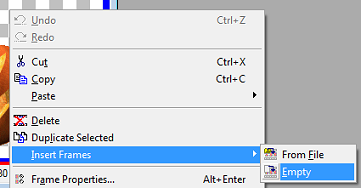
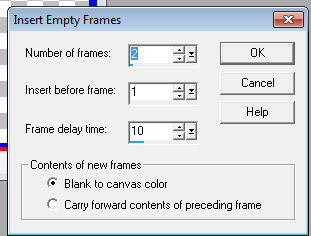
Right Click inside the new animation and Insert Frames
Right Click on the blue bar of the pumpkin file and choose Copy.
Paste Into the Selected Frame

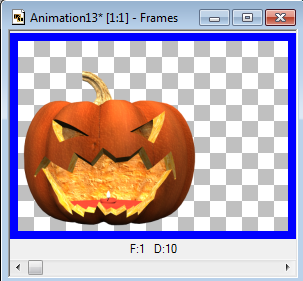
Place it so that your pumpkin is to the left like this:
~STEP 10~
Now open the flame animation from your supplies.
Edit and Select All and then Copy.
Paste as New Animation and Edit and Select All again.
Close the original or minimize it (in case you make a mistake, if you're like me).
This will keep the original flame animation intact so you can use it again.
Now you need to resize it.
Click on the Animation Tab on your top toolbar.
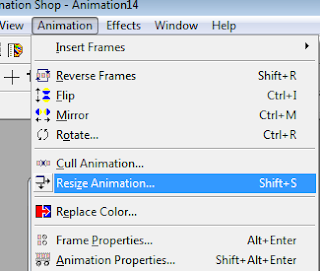
Resize it 20%. Smart Size checked.
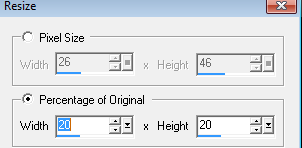
The new size looks incredibly small but it fits perfectly into the mouth of the pumpkin.
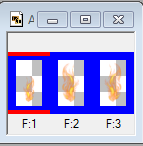
Right Click on the blue bar of the flame and then Right Click inside the first frame of the pumpkin.
Paste Into Selected Frame

Place the flame directly over the little white candle inside.
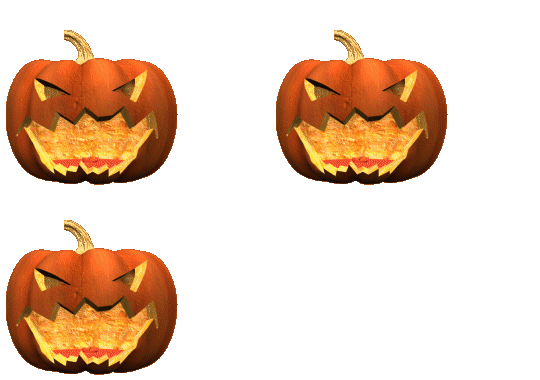
Save your pumpkin using the same settings for the letters.
Now your pumpkin is ready to be turned into an alpha :-)
~STEP 11~
Take your letters and make sure that all the frames are highlighted.
Right Click and Copy then minimize your letters and move them to the top of your workspace.
Right Click inside your workspace and Paste as New Animation
until you have as many copies as you can deal with.
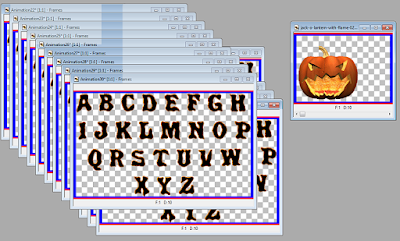
Take the first one then choose Edit and Select All
Go to your Crop Tool  and your Options will appear.
You will be able to Crop or Clear. The Clear option comes in handy :-)

Trace around the letter A like this and Click on the Crop button:
If you make a mistake (we all do it) just click on the Clear button.
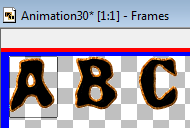
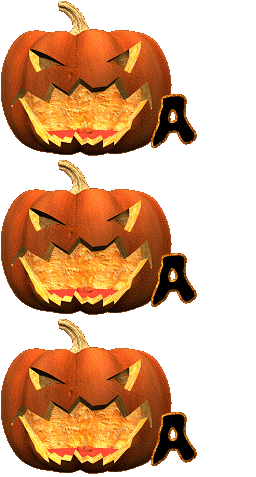
You should now have the letter A with three frames.
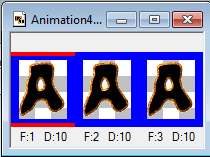
Click on File as Save As 'A.gif'
Now click on the little white arrow 
Right Click on the blue bar of your Letter A and Choose Copy
Right Click inside your pumpkin and Paste Into Selected Frame

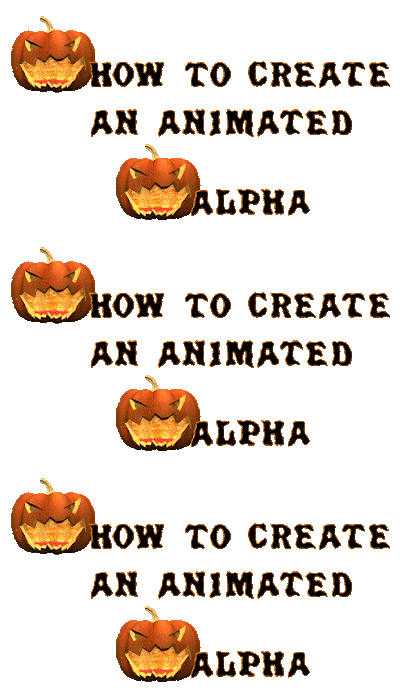
Place your letter where you want it to be and Save As 'A1'
Click on Edit-->Undo Optimize Animation--->Undo Paste
Take your next batch of letters and Edit--->Select All
Go to your Crop Tool and Crop your letter B.
Click on File as Save As 'B.gif'
Click on the little white arrow
Right Click and Copy.
Right Click inside your pumpkin and Paste Into Selected Frame
Save as 'B1'
Repeat the process until you have finished the Uppercase.
Creating your Lowercase letters will go quickly compared to the Uppercase.
You do not need to click on the little white arrow or Copy.
You just Crop and Save.
I usually save lowercase as aa, bb, cc etc.
I hope this tutorial has helped you.
Big Hugz,
Susan
To view an image in its original size just click on it.
Many people have asked me down through the years if I was going to make a tutorial for an animated alpha
but I've always put it off, because there is so much more work involved in creating animated alphas,
(and many many more screenshots for a tutorial) than for your standard png alpha.
If you have never created an alpha, please read my tutorial on how to create a non-animated alpha
so you will be familiar with the process.
When you create an animated alpha, you will have to save your alphas in Animation Shop better known as AS.
One thing you need to know about creating your first animated alpha
is that you will meet up with the dreaded Optimization Wizard in Animation Shop.
Alpha Creators for over a decade now, have had a love-hate relationship with the Optimization Wizard.
For the lack of better words all I can tell you is that it's MOODY.
Well, that might be an understatement :-)
A lot of your success will depend on the font you choose. Some fonts work well with the Optimization Wizard,
while others tend to get jagged edges, and no amount of fiddling with the settings, mumbling under your breath,
or yelling at your computer will keep your letters looking like you originally made them.
There will be some alphas that require do-overs. A lot of do-overs. With a different font or color or both.
And then there are alphas that are a piece of cake. You will have quite a few of those.
A perfect blend of the right font and the right settings and you'll almost forget the trouble it gave you last week.
IT being the Optimization Wizard.
Choose the graphic or tube you would like to use for your alpha.
Keep in mind, that people use alphas to make name tags or extras, so if the tube and/or the font is too large,
and there are a lot of letters in the person's name, the finished tag will be enormous.
Before we go any further let's grab the supplies you are going to need for this tutorial.
Orange Glitter-- Place in your Patterns folder
Fire-- You will need to open this in AS
Spirits Font-- You can place this in your Fonts folder or open it with your Font program.
You can grab your SUPPLIES (from 4shared)
OR you can grab your SUPPLIES (from dropbox)
The tube I am using by Anita Lee is not included with your supplies.
The name of the tube is AL2005~halloween02
and you can find it by visiting the Halloween section of her awesome website here:
Anita's Creations.
You don't have to use the jack o'lantern since the process is the same with any tube.
Since this is going to be an animated alpha, I decided to add a little flame for the inside of the
jack o' lantern but more on that later :-)
Before you get started it's a good idea to create a folder for your alpha, open it and keep it minimized
so you can keep track of the letters you've made if you get interrupted.
When you have your tube opened up in PSP choose the colors that you want to use.
I am using orange glitter for the foreground (the outline color) and black for the background (the fill color).
I originally wanted to use a black outline filled with orange glitter, but the Optimization Wizard,
despite much sweet talk and wooing, refused to cooperate with me. So I went back and re-made the letters.
Deciding which font to use can be tricky. You'll want to use a font that compliments your tube or graphic
and if possible, one that has both upper and lowercase. Some fonts don't have the lowercase.
I am using the SPIRITS font included in your supplies.
The first half of your work will be done in PSP.
This is where you create your letters and your layers for the animation.
~STEP 1~
Open your tube in PSP.
If you are using the jack o'lantern by Anita Lee, Resize it 40% using Smart Size.
Since there is not much you can do with it now, copy it and open it in AS as a new animation.
~STEP 2~
Click on File and then New.
I always use a workspace of 800x800. This way I can fit the lowercase letters if I have them.
The Materials Palette is where your animation magic begins.
The foreground is set at Pattern -orange glitter - and black is for the background.
For the first layer of your letters you will want the Angle to be set at 0.
~STEP 3~
Now you are ready to start making your letters.
The Text Tool is on your side tool bar and looks like the Capital A.
The font size is important. You don't want your letters to be too large or too small.
IMPORTANT FOR WINDOWS 7 USERS
Minimizing the font will usually not work. You will need to download a FREE font program like
AMP Font Viewer
Open the font of your choice in the Font Viewer and then it will become available in the Drop Down Font Menu in PSP.
For this font I chose size 60. With some fonts, size 60 would just be too large.
Your Text Tool settings should look like this. Make sure the middle alignment is checked
and that Create as Floating is selected. The Stroke Width is set at 2.
For this alpha I only used Uppercase letters. Set your Caps Lock button and type in each letter of the alphabet.
A quick note here:
You can make your lowercase letters right after your Uppercase and take them both to AS at the same time.
Make sure that you leave enough room in between each letter so that you will not have to use the Eraser Tool.
Once you are finished typing in your letters click OK.
It should look like this with dancing ants around the letters:
~STEP 4~
Now you will need to add the Inner Bevel effect.
You can use these settings or ones of your own choosing.
Click on Effects-->3D Effects and Inner Bevel
Select None.
Click on Edit and then Copy.
Paste as New Image.
You will see in your Layer Palette that this layer is called Raster 1.
You will also notice that the new image is quite small compared to the original.
Don't freak out, that is the way it is supposed to be.
~Step 5~
Now it is time to make the second layer of your letters.
Go back to your original workspace with your letters.
Click on Edit-->Undo Select None-->Undo Inner Bevel-->Undo Text
Now you will have a blank workspace to add your second layer of letters.
Click on your Text Tool and place your letters.
Make sure that your letters are highlighted so your changes will take affect.
Go to your Materials Palette and change the Angle to 120
Click OK for your letters. You will see the same dancing ants around your letters.
Click on Effects-->3D Effects and Inner Bevel using the same settings.
Select None.
Click on Edit and then Copy.
Go to your first layer of letters, Right Click on the Blue Bar and Paste as New Layer
(I always right-click on the Blue Bar when I need to Copy something, instead of Edit--Copy)
You will see in your Layer Palette that this layer is called Raster 2.
Now your second layer is finished. You're moving right along.
~STEP 6~
Now it is time to make your third and last layer of letters.
Go back to your original workspace with your letters.
Click on Edit-->Undo Select None-->Undo Inner Bevel-->Undo Text
Now you will have a blank workspace to add your third layer of letters.
Click on your Text Tool and place your letters.
Make sure that your letters are highlighted so your changes will take affect.
Go to your Materials Palette and change the Angle to 240
Click OK for your letters.
Click on Effects-->3D Effects and Inner Bevel using the same settings.
Select None.
Click on Edit and then Copy.
Go to your second layer of letters, Right Click on the Blue Bar and Paste as New Layer
This layer will be called Raster 3. These three layers will be your three frames of animation.
Open Animation Shop open and make sure that your Propogate Paste button is active.
Now you are ready to take your letters to Animation Shop or AS.
~STEP 7~
Make sure that Raster 1 of your letters is active (highlighted)
Right Click on the blue bar at the top and choose Copy
Go to AS and Right Click and then Paste as New Animation
Go back to PSP and make sure that Raster 2 is active.
Right Click on the blue bar and choose Copy.
Go to AS and Right Click inside your letters and then Paste After Current Frame
Go back to PSP and make sure that Raster 3 is active.
Right Click on the blue bar and choose Copy.
Go to AS and Right Click inside your letters then Paste After Current Frame
~STEP 8~
Now you are ready to check your animated letters.
Click on Edit and Select All. Click on the Icon that looks like a filmstrip.
If everything looks good and there is nothing wrong with your animation
you are ready to meet the Optimization Wizard :-)
~Step 9~
When this panel comes up choose Animated Gif File and then Choose Next
When this panel comes up click the Customize button
This panel is the Color Tab. Use the settings below:
Optimized Median Cut
Error Diffusion
Click on the Optimizations Tab
This panel is up to your own choosing. Sometimes, if your animation isn't working right
you can fiddle around with this panel and try to fix it.
Click on the Partial Transparency Tab
This is the most important part of the Optimization Wizard.
For this alpha I used orange for the color because of the orange glitter and the orange in the pumpkin.
I usually pick white for the color so that it won't show up as much on a transparent background.
Convert pixels less than 40
This number can be changed from alpha to alpha.
Click OK and then Next until you are finished
Click on File and Save As.
When I save the letters I put the name of the alpha and the font and font size in its name.
For future reference.
Well, now it's time to make your alpha. Are you ready? :-)
~STEP 9~
You will spend the rest of your time now in AS.
Your pumpkin "blank" should be sitting patiently in AS waiting to get animated.
Now we are going to focus on getting your pumpkin ready.
But, wait, your pumpkin needs a little more room for its letters.
Click on File and then New. I am using 270x190.
Make sure that Transparent is checked.
Right Click inside the new animation and Insert Frames
Right Click on the blue bar of the pumpkin file and choose Copy.
Paste Into the Selected Frame
Place it so that your pumpkin is to the left like this:
~STEP 10~
Now open the flame animation from your supplies.
Edit and Select All and then Copy.
Paste as New Animation and Edit and Select All again.
Close the original or minimize it (in case you make a mistake, if you're like me).
This will keep the original flame animation intact so you can use it again.
Now you need to resize it.
Click on the Animation Tab on your top toolbar.
Resize it 20%. Smart Size checked.
The new size looks incredibly small but it fits perfectly into the mouth of the pumpkin.
Right Click on the blue bar of the flame and then Right Click inside the first frame of the pumpkin.
Paste Into Selected Frame
Place the flame directly over the little white candle inside.
Save your pumpkin using the same settings for the letters.
Now your pumpkin is ready to be turned into an alpha :-)
~STEP 11~
Take your letters and make sure that all the frames are highlighted.
Right Click and Copy then minimize your letters and move them to the top of your workspace.
Right Click inside your workspace and Paste as New Animation
until you have as many copies as you can deal with.
Take the first one then choose Edit and Select All
Go to your Crop Tool and your Options will appear.
You will be able to Crop or Clear. The Clear option comes in handy :-)
Trace around the letter A like this and Click on the Crop button:
If you make a mistake (we all do it) just click on the Clear button.
You should now have the letter A with three frames.
Click on File as Save As 'A.gif'
Now click on the little white arrow
Right Click on the blue bar of your Letter A and Choose Copy
Right Click inside your pumpkin and Paste Into Selected Frame
Place your letter where you want it to be and Save As 'A1'
Click on Edit-->Undo Optimize Animation--->Undo Paste
Take your next batch of letters and Edit--->Select All
Go to your Crop Tool and Crop your letter B.
Click on File as Save As 'B.gif'
Click on the little white arrow
Right Click and Copy.
Right Click inside your pumpkin and Paste Into Selected Frame
Save as 'B1'
Repeat the process until you have finished the Uppercase.
Creating your Lowercase letters will go quickly compared to the Uppercase.
You do not need to click on the little white arrow or Copy.
You just Crop and Save.
I hope this tutorial has helped you.
Big Hugz, Susan
psp.alphagirl@gmail.com




Hi Susan. Love your alphas and have for years!! :-) I was wondering if you have a tutorial for adding snow inside of a font or frame of a tag. I see so many neat tags with falling snow just in a specific area of the tag and I want to learn how to do that. Any direction you can give me would be much appreciated. Thank you for your time and all your alphas. Hugs, Jalene
ReplyDeleteJalene, Thank you so much for your kind words.
ReplyDeleteI haven't dabbled much with rain and snow but I do like the effects. I have one reindeer alpha with snow here:
http://alphas-etc.blogspot.com/p/blog-page_9.html
Now I want to make a snowy alpha :-)
HUGZ
Susan
Wow,this triggers me to try to make an alpha,but I hope I can do it,because it will be my first and it seems it is a lot of work..thank you for the tutorial,Susan!
ReplyDeleteHug,Lucia xx
Lucia, if you need help just send me an email and I will try to answer any questions you might have.
Delete