
The idea for this tutorial came from my Ready For Spring alpha.

If you don't have a Silver pattern you can right click and save this one.

STEP 1
For my original sheet of letters I went with a silver glitter fill
because I thought the silver
would be easier for a color change and the noise was already built-in.
You don't need to change the Angle for this to create animation because the Fill will
be animated by using different colors for each Layer instead of by changing the Angle.

STEP 2
For the 1st Layer I needed to get the Hue and Saturation (H and S)
Numbers so I opened a screenshot in PSP showing all 3 frames of my saved letters.
For the purple H =198 and S =123. You will need to write this down
if you have a good forgetter like me.
Now I am going to change the color from silver to purple.
YOUR 1st Layer will become your 1st Frame in Animation
Shop.

Go to Adjust and Hue and Saturation and Colorize

This panel will pop up. Put in the numbers Hue 198 and Saturation
123

And now you have Purple letters.

I like to add an Inner Bevel to my letters and this is one of the settings that I use:
Width = 10
Smoothness = 5
Depth = 10
Ambience = 5
Shininess = 5
Angle = 45
Intensity = 30
Elevation = 60

Right Click on your Blue Title Bar and Choose Copy.
Right Click in your Workspace and Paste as New Image.
Now you have your first layer.

Step 3
Click on your original sheet of letters to make it active.
Go to Edit and Undo (the Inner Bevel and Colorize) -
until you have your Silver Letters again.
For the 2nd Layer I used Orange.
H = 28 and S = 208


Your letters will be orange now.
Add your Inner Bevel if you like and then Right Click and COPY.
Go to your Purple letters and PASTE AS NEW LAYER
Go to your Purple letters and PASTE AS NEW LAYER
This is your 2nd Layer. This will become Frame 2 in
Animation Shop.

For my 3rd Layer I chose Green
H= 67 S= 255
Your 3rd Layer will become your 3rd and Final Frame in Animation Shop.

I changed the color to Green and added the Inner Bevel and
then I Copied and Pasted as a New Layer.
Now we have 3 Layers ready for Animation Shop

Highlight the Layer that you want to use for your 1st
Frame.
When you highlight a layer, you are making it Active.
Here I have Raster 3 highlighted.
Right Click on the Blue Title Bar and then Choose
COPY

Go to Animation Shop or AS - and then Paste as New Animation.
Go back to PSP and Highlight the 2nd Layer
Right Click and Copy.

Go to AS -- Right Click INSIDE your letters
and then Paste After Current Frame.
Now you have 2 frames. The Green letters and the Orange
Letters.

Go back to PSP and Highlight the 3rd and last layer. Right Click and Copy.
Go to AS and then Paste After Current Frame.
Now you are ready to Save your letters.
If you are not familiar with the Optimization Wizard it can be a frustrating experience,
even if you use it all the time.
Click on File and scroll down to Optimization Wizard.

This panel will pop come up. Click Next.

Click on Customize
Here is where it gets tricky.
Some of your letters will require a lot of tweaking to get it right.
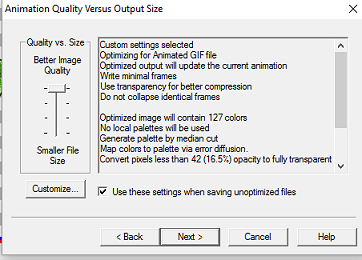
This is the basic setting I use for letters.
DO NOT CLICK OK YET

Click on the Optimizations tab next to the Colors tab.
I admit that I am not real knowledgeable when it comes to THIS section,
so I usually use this setting.
Now, Click on the Partial Transparency tab.

The settings here will determine whether your letters stay pretty much
the way they were meant to ... OR become an ugly jagged mess.
Everyone has their own preferences when it comes to this part.
I've come to believe that our success rate depends mostly on the font we use.
NOW you can click OK and Save your letters :-)

If you have any questions, please feel free to drop me a line. :-)
I hope this tutorial helps you.
Hugz
Susan
I hope this tutorial helps you.
Hugz
Susan
No comments:
Post a Comment