This tutorial will show you how to create letters using a
Floatie or an animated background.
To create your own Floatie click HERE:


Download the alpha here:
Valentine Gnome 01-09-20 SMO
When I made this Valentine Gnome Alpha I couldn't find an animated
background or floatie that matched it so I made my own.
STEP 1
Open PSP and AS (animation shop).
Make sure that your Propogate Paste is active.
Open your animated background in AS then Edit and Select All
so that ALL of your frames are highlighted.
Go to Edit and Copy.
Minimize AS.
Go to PSP
Right Click in your workspace and Paste as New Image.
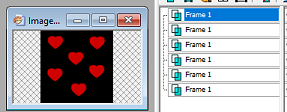
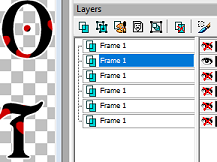
All your frames will be there. This animated bg has 6 frames.
So in PSP it will have 6 Layers.
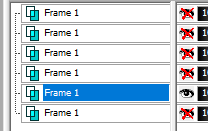
The most important thing to remember about using a floatie or an
animated fill for your letters is that you need to make sure the layers
you are not using are X'd out
Like This:
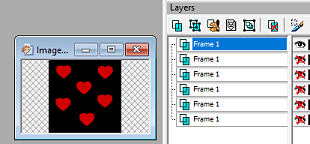
This animated fill has 6 layers.
Some animated bg's can have as many as 12 layers.
It's easy to get confused when you are working with that many layers.
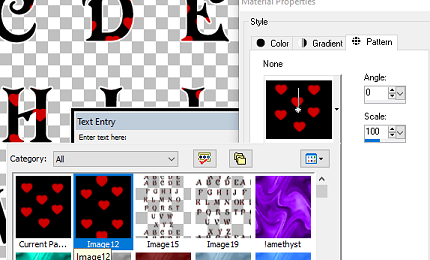
Now you are ready to use your animated fill.
Go to your Background and Choose Pattern
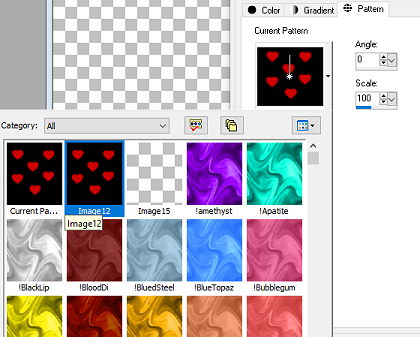
Here it says Image 12 but yours will say something else.
Don't choose Current Pattern.
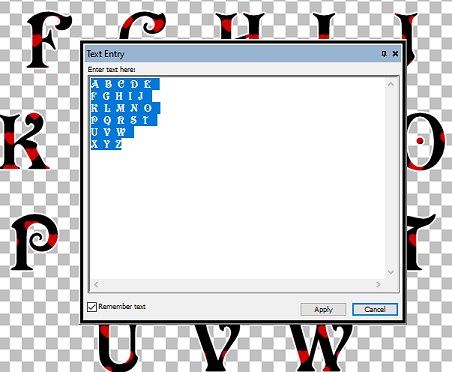
Create a NEW file around 900 x 900 so your letters will have enough
wiggle room and use a font that will show some of your animated fill.
Make sure that your letters in the white panel are highlighted so that
your changes will take place.
Click Apply.
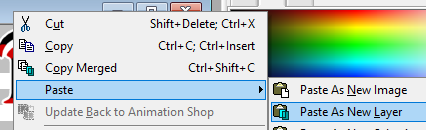
Right Click on the blue title bar and choose Copy.
OR choose Edit and Copy.
It's okay if your letters are still selected.
Right Click in your workspace and Paste as New Image.
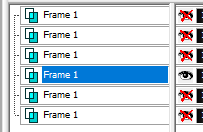
Now that you have created your 1st layer of letters go to your
animated fill and X out the Top layer.
Highlight the 2nd Layer.
Click on your sheet of Letters
Go to Edit and Undo Text.

Using your Text Tool place your letters again, but DO NOT click Apply
Go to your Background Palette and Choose your image fill again.
You need to do this so that your changes (2nd layer highlighted) will take place.
Click Apply.
With your 2nd Layer of letters complete,
Right Click on Blue Title Bar
OR
Edit and Copy then Paste As New Layer.
Go to your Animated Fill and X out the 2nd Layer
Highlight the 3rd Layer.

Click on your Letters and Edit and Undo Text
Place your Letters again.
Go to your Background Palette and Choose your image fill again.
DO NOT click Apply.
Go to your Background Palette and Choose your Image again
to reflect the new changes.
Go to your Animated Fill and X out the 3rd Layer
Highlight the 4th Layer.
Place your letters again, but DO NOT click Apply
Go to your Background Palette and Choose your image fill again.
Click Apply.
Go to Edit and Copy.
Right Click on Blue Title Bar of Letters
OR Edit and Copy and Paste As New Layer.
Go to your Letters and Edit and Undo Text
Go to your animated fill and X out the 4th Layer.
Highlight the 5th.
Place your letters again, but DO NOT click Apply
Go to your Background Palette and Choose your image fill again.
Click Apply.
Go to your Letters and Edit and Undo Text
Go to your animated fill and X out the 5th Layer.
Highlight the 6th.
Place your letters again, but DO NOT click Apply
Go to your Background Palette and Choose your image fill again.
Click Apply.

With all 6 layers complete you can choose to save your letters as
an Animation Shop file
(Newer versions of PSP do not have this option)
You can copy and paste your layers in AS one layer at a time.

When I made this Valentine Gnome Alpha I couldn't find an animated
background or floatie that matched it so I made my own.
STEP 1
Open PSP and AS (animation shop).
Make sure that your Propogate Paste is active.

Open your animated background in AS then Edit and Select All
so that ALL of your frames are highlighted.
Go to Edit and Copy.
Minimize AS.
Go to PSP
Right Click in your workspace and Paste as New Image.
All your frames will be there. This animated bg has 6 frames.
So in PSP it will have 6 Layers.

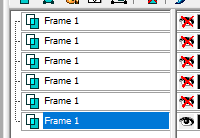
The most important thing to remember about using a floatie or an
animated fill for your letters is that you need to make sure the layers
you are not using are X'd out
Like This:

This animated fill has 6 layers.
Some animated bg's can have as many as 12 layers.
It's easy to get confused when you are working with that many layers.
Now you are ready to use your animated fill.
Go to your Background and Choose Pattern
Here it says Image 12 but yours will say something else.
Don't choose Current Pattern.
Create a NEW file around 900 x 900 so your letters will have enough
wiggle room and use a font that will show some of your animated fill.
Make sure that your letters in the white panel are highlighted so that
your changes will take place.
Click Apply.
Right Click on the blue title bar and choose Copy.
OR choose Edit and Copy.
It's okay if your letters are still selected.
Right Click in your workspace and Paste as New Image.
Now that you have created your 1st layer of letters go to your
animated fill and X out the Top layer.

Highlight the 2nd Layer.
Click on your sheet of Letters
Go to Edit and Undo Text.
Using your Text Tool place your letters again, but DO NOT click Apply
Go to your Background Palette and Choose your image fill again.
You need to do this so that your changes (2nd layer highlighted) will take place.
Click Apply.
With your 2nd Layer of letters complete,
Right Click on Blue Title Bar
OR
Edit and Copy then Paste As New Layer.
Go to your Animated Fill and X out the 2nd Layer
Highlight the 3rd Layer.

Click on your Letters and Edit and Undo Text
Place your Letters again.
Go to your Background Palette and Choose your image fill again.
DO NOT click Apply.
Go to your Background Palette and Choose your Image again
to reflect the new changes.
Go to your Animated Fill and X out the 3rd Layer
Highlight the 4th Layer.

Place your letters again, but DO NOT click Apply
Go to your Background Palette and Choose your image fill again.
Click Apply.
Go to Edit and Copy.
Right Click on Blue Title Bar of Letters
OR Edit and Copy and Paste As New Layer.
Go to your Letters and Edit and Undo Text
Go to your animated fill and X out the 4th Layer.
Highlight the 5th.

Place your letters again, but DO NOT click Apply
Go to your Background Palette and Choose your image fill again.
Click Apply.
Go to your Letters and Edit and Undo Text
Go to your animated fill and X out the 5th Layer.
Highlight the 6th.

Place your letters again, but DO NOT click Apply
Go to your Background Palette and Choose your image fill again.
Click Apply.
If you would like to add an Inner Bevel to your letters
Make sure that ALL your Layers are Open.
Highlight the TOP Layer.
Go to Selections-->Select All-->Float-->Defloat
Go to Effects-->3D Effects-->Inner Bevel.
Choose your favorite Inner Bevel Setting for Alphas.
This is my Inner Bevel Setting:

Highlight the next layer and Apply the Inner Bevel.
Do this for each layer.
an Animation Shop file
(Newer versions of PSP do not have this option)
You can copy and paste your layers in AS one layer at a time.
Please let me know if you have any questions.
Hugz, Susan
No comments:
Post a Comment